Wednesday, April 29, 2009

Oven Roasted Vegetables


With garden planting starting to be on people's mind and all the great vegetables that come from them, I have this great recipe that can make a meal in itself!

You don't have to wait for the garden to start producing - go to your grocer tomorrow for dinner. * Deb


Submitted by: Deb B.

1 Medium Zucchini
1 Medium Summer Squash
1 Medium Red Bell Pepper
1 Medium Yellow Bell Pepper
1 pound of fresh Asparagus
1 Red Onion
3 Tbsp. Extra Virgin Olive Oil
1 tsp. salt (we like sea salt)
1/2 tsp freshly ground black pepper

Cut all the vegetables into bit size pieces and put everything into a large bowl - -toss together.

Place in a 450 degree oven in a large roasting pan or cookie sheet - spread out in a single layer. Roast for 30 minutes, stir occasionally until the vegetables are lightly brown and tender.

If you are trying to eat healthier - this is a great way to serve vegetables differently. You can put any vegetable that you like, increase or decrease another. Enjoy!

************************************************************

Thanks Deb for this wonderful recipe. I couldn't wait to make this for dinner. The married flavors of these vegetables is just fabulous! I recommend you make this before the fresh asparagus is off. Take my word, this is um, um, good!


-Debbie -

Thursday, April 23, 2009

Sunset Beef Stew - Box Oven Cooking


I love the brilliant red sunsets that we are often graced with in the Sanpete Valley. They can be truly inspiring! This colorful red stew is named for their beauty.


Before cooking ********************After cooking

2 lbs. stew meat, cubed and any fat removed
2 onions, chopped
2 stalks celery, diced
1 green pepper,coarsely chopped
6 carrots cut int 2 inch pieces
3 large potatoes, peeled, cut into chucks (more if small potatoes)
2 tsp. salt
1/4 tsp. pepper
1 tsp sugar
1 bay leaf, (opt.)
Oregano to taste
2 Tbsp. chopped fresh parsley - I really cilantro so I used it in place of the parsley
3 Tbsp. minute Tapioca
2 cups tomato juice or V-8 juice -I like V-8 best

Put meat into large, heavy pan with a tight lid. Don't brown meat first.

Layer onions, celery, green pepper, carrots and potatoes.

Combine salt, pepper, sugar, seasonings, parsley and tapioca with 2 cups of tomato or V-8 juice.

Pour this mixture over the vegetables and meat.

DO NOT STIR

Cover tightly and bake in the oven at 275 for 4 hours or 325 for 3 hours.

BOX OVEN: Bake with 18 to 20 briquette coals for about 3 hours. Replenish coals half way through or as needed.

BOX OVEN COOKING

In this post, I will be giving direction on how to cook wonderful meals in an apple box. You can cook almost anything in a homemade box oven that you would cook in your kitchen oven. It is easy, fuel economical, and much easier to manage than a dutch oven. Don't get me wrong, I love using my "big black pot" but if I was in an emergency situation and needed to cook for days without my kitchen oven, I'd definitely take my box oven. So, let's get started! I promise, this really works great!
Important Note: The box oven may only be used outside!

PREPARING THE COALS


The easiest way to prepare the coals is with a barbecue chimney charcoal starter. It is easy to find these in the spring at most big box and chain stores that are selling barbecues. The starter is a metal cylinder that is divided into two parts with a grate in between. You add unlit briquettes to the top part and a crinkled up sheet of newspaper to the bottom part. Light the newspaper with a match or lighter. The fire will flame up through the cylinder and catch the charcoal on fire. In about 10 to 15 minutes , depending on how many briquettes you have in the flue, you will have hot charcoal for cooking. Watch carefully after the initial flame up because sometimes it just doesn't take and you'll need to repeat this step. You don't need to use any lighter fluid.


I put a pie tin under the flue to catch the ashes so I can carefully dispose of them.

Now you need to dump the coals into Double pie tins. Basically, you put two pie tins together in the shape of an hour glass and nut and bolt them together. This is really important because the bottom tin works to insulate the bottom of the box from the heat of the charcoal. You can not put a single pie tin on the box floor or you will burn the box. Believe me, I did this by mistake one time and I burned the box and the tablecloth underneath. But when I have used the hourglass, double tins, I have never burned a box.


Turn the pie tin over so the nuts and bolts are on the bottom.

Put the coals in the top. Move the tins by using long handled tongs.


COOKING IN THE BOX OVEN


Now the fun begins! There are two ways to use your oven. First, top oven cooking for light things like cookies, rolls, pies, pizza, baked potatoes etc. and bottom oven cooking where you use a pot and cook things like roasts, chicken, hams, stews basically anything large and heavy.


TOP OVEN COOKING


The cookie rack should be wired about 4 inches from the top of the box for this type of baking. I like to use two 9 inch cake pans to bake almost everything in. Because they are round, the hot air is able to circulate and bakes everything much more evenly. I had a lady call me to say her over just wasn't working and when I questioned her, I found out she was using a large cookie sheet that went from wall to wall. You wouldn't do that in your kitchen oven and you can't do that in this oven. You can use a small cookie sheet but the outside will cook faster than the inside so I still prefer to put almost everything in cake pans. I can put 5 Rhodes type rolls in two pan and cook 10 at a time and 6 cookies in each pan and cook 12 at a time. Use two 6 count muffin tins so air can circulate in between.

The coals in the double pie tins are placed on the floor in the middle of the box. What you are cooking goes on the cookie rack wired about 4 inches from the top. Once everything is in place, put the top of the apple box that has been covered with foil up against the open side. Don't worry about the crack that will always be evident between the two boxes because the charcoal actually needs oxygen to burn and the crack supplies just about the right amount. I usually put a rock in the outside box to keep the wind from blowing my box away. If it is really windy, I also put one inside the cooking box. I have had microburst of wind that have picked my box up and thrown it and so I like to do this just to be safe. Don't use any rocks that have been in a river bed because they could explode.


I baked these biscuits with the coals that were left after I baked the Sunset Stew.

You will need 13 to 15 coals to cook most things on the top. Somewhere I once read that each briquettes is about 25 degrees of heat and I have found this is about right. 25 x 15 is about 375 degrees. On a hot day, I would use 13 but on a cold day I need to up it to 15 or so. Cold and wind do affect the oven a little but not a tremendous amount. DON'T PEEK IN THE BOX UNTIL YOU SMELL YOUR FOOD! This is important because every time you open your box you loose a tremendous amount of heat. You'll need to cook like your great, great Grandma did by using your nose to smell when things are getting done. Also, put your hand above the crack and after a while you can kind of gauge if your box is too hot or too cold. Periodically, knock the ash off the briquettes with your tongs. Ash acts as an insulator and will cool down your oven.


Most cookies take about 12 minutes to cook and if that is all I was baking, I have a lot of coal left. One day I experimented by covering my pie tins of hot coals tightly with aluminum foil and thus put out the coals because of no oxygen. When they were totally cooled, I knocked the ash off and put them in a zip lock bag. Next time I cooked, I added these briquettes to the new ones and they did ignite and added some heat. Normally, I don't save coals but in an emergency situation, it may be important to conserve every bit of fuel source you have so I share this just for an FYI.


BOTTOM COOKING

Turn your box over so the cookie rack is now 4 inches from the bottom. You will also need 2 empty cans that are 4 inches high. Regular size evaporated milk cans are just right. Place the cans under the cookie rack and situate so they can hold the weight of the heavy pot that you will set on the rack. Place the pot on one side of the oven and the coals in the pie tins on the opposite side on the box floor underneath the cookie rack. It will be a tight fit but it works. Now the pot will get hotter on the side nearest the coals, so you will need to rotate the pot every half hour or so to achieve even cooking. I use about 18 to 20 coals for large item cooking. The pot and larger items seem to kind of soak up the heat so I need to up the coals. The Sunset stew I made took about 3 hours and I needed to replenish the coals by adding 6 or 7 new one to the old ones about half way. The 18 to 20 coals is just a general guide line and depending on weather and coldness of item when you start, you may need to adjust but this guide line should be in the ballpark.


If you're still with me, I'm amazed at your tenacity and as a reward, I'll now (finally) give you instructions for making your own amazing Box Oven.

Making A Box Oven

Step 1: You will need an apple box, (most grocery stores will give you one if you ask and don't let them talk you into a banana box because it won't work), roll of heavy duty aluminum foil, duct tape, 16 gauge steel wire, nail, cookie rack, needle nose/regular pliers, stapler, pie tins, drill and 2 sets of nuts and bolts.


Step 2: Cover the entire inside of the box with heavy duty foil and overlap the foil about 4 inches on all sides. Shiny side out on the foil. You will need to run the foil width wise and length wise to get the whole inside covered. Make sure every part of the inside of the box is covered. A few staples put here and there helps to hold things in place while you are working. When everything is covered, trim the overlapped outside foil to the 4 inches and then run duct tape around the outside edge of foil.


Step 3: Install the cookie rack by evenly punching two sets of small holes 1/2 inch apart and up 4 inches from the bottom of the inner box with a nail. You should have a total of 8 holes. The holes go on the ends about one inch in from the edges. Through each of these 4 sets of small holes, you will insert about 6 to 9 inches of # 16 gauge wire that is bent in the shape of a U. Push the U into the holes from outside to inside of box. Secure around cookie rack and twist tight. Be as precise as you can in your measurements so you can have a level rack.

You can buy a large cookie rack at many speciality kitchen shops but I just go to the dollar store and get their small, cheap racks and wire them together. Yes, there is a small ridge but it really doesn't make that much difference.


Well there you have it. Whew! I may not do another post for a week. Really, I hope you have fun with your box oven and may you prepare many delicious meals for family and friends.
Have Fun!

-Debbie-

Wednesday, April 22, 2009

Picnic Carrot Cake


A Great Picnic Cake!


This is a fabulous cake to take on picnics. It 's not crumbly and when the frosting dries, it's not sticky. We love the rich, full flavor that is reminiscent of chuckwagon spice cakes served on old cattle drives. One preparation item to note on this recipe is that it must be started the night before you plan to make it. The carrots, raisins and spices like to get friendly together overnight in the frig. It keeps very well and cuts into nice, clean bars of cake.

This cake is also unusual in that it doesn't have any eggs in it. So, if you run out of eggs and need a cake for Sunday dinner, this is the perfect choice!

1 1/2 cups sugar
1 1/2 cups water
1 cup raisins
1 Tbsp. butter
1 tsp. cinnamon
1/2 tsp. nutmeg
1/2 tsp. cloves
2 large carrots, grated
2 1/2 cups flour
1/2 tsp. salt
1 tsp. soda
2 tsp. baking powder
1/2 cup chopped walnuts

Icing:
1 cup brown sugar
2 Tbsp. water
2 Tbsp. butter

Combine, sugar, water, raisins, butter, cinnamon, nutmeg, cloves and carrots in a saucepan. Simmer for 5 minutes, cool, and then put in a covered container and refrigerate overnight.

Next day: Mix together flour, salt, soda, baking powder and walnuts. Add this mixture to the refrigerated mixture, stirring well.

Pour into a 9 x 13 inch baking pan sprayed with Pam.
Bake at 350 degrees for 45 minutes to an hour.

Icing: Put brown sugar, water and butter together in a saucepan and warm on low heat until sugar dissolves. Pour over the warm cake and then let cool before cutting.

-Debbie-

Sunday, April 19, 2009

Brother Dave's Potatoes


Dutch Oven Potatoes With A Sweet Personality!

The surprising ingredient- Granny Smith Apples


My brother is one of the best dutch oven cooks I know! He has worked in the scouting program on and off for over thirty years and in that time, he never cancelled a camping trip. His word is his bond and if a trip was planned they camped. Sometimes they had to change the place, but they camped. The world is a better place because of his caring, gentle heart.

8-10 lbs. new red potatoes
2 sliced or diced onions (red are best because they adds color and are so sweet)
3 to 4 granny smith apples
4-6 coarse grated carrots (I also like to use matchstick carrots that are store cut)
1/2 to 1 lb. bacon

12 " dutch oven

During warm weather, about 18 briquettes on top and 10 briquettes on bottom but the day I cooked I needed to use more because it was cold.

Cut up bacon in small pieces (cold, partially frozen bacon is easiest to cut)

Cook bacon in dutch oven until done. If the bacon is very fatty, pour off part of the grease. Add sliced potatoes, sliced or diced onions, coarse grated carrots, quartered or sliced granny smith apples.

Salt and pepper. ( I like to drizzle a little extra bacon fat on top of potatoes)


Every once in a while, turn the dutch oven a quarter turn. Do not lift the lid until you smell the potatoes. There is no need to open the pot and lose heat until you smell the potatoes.
DO NOT OVERCOOK!

Have fun with this "frizzle" recipe. I love to see what comes out of my big black pot and I hope you have fun with this one.

Caution: Always use great care using briquettes. I use an industrial size old cookie sheet covered with foil. I also place old pie tins under my charcoal lighter to hold the coals. After you are finished, dump the ashes in a metal pail and dowse with water until totally out. Or dump coals on aluminum foil and drown with water and then roll everything up in foil. Just make sure your coals are TOTALLY out!

Have Fun! - Debbie-

Thursday, April 16, 2009

Puddle Pies


This rich and luscious recipe makes two pies. One for your family and one to give away. Share the yum and the calories. A win-win for everyone!


After being at our cabin Easter weekend, the dominant outdoor condition was mud puddles, everywhere! If we got off the gravel, we were sucked into the brown goo. That experience was the genesis for these little puddle pies. I usually make this recipe in a 9 x 13 pan but I found that if I split it up into 2 pie pans we could eat one and share one. We did just that this week with a new mom and her family. I think everything is better when it is shared!

I left the white in recognition of the snow that was still evident in patches around the puddles.

Since you can't really get out and around on the Mountain a great deal right now, why not stay indoors and make a couple of puddle pies and share one with your neighbor!


Cooking tip: After I get the pie crust pushed into the pan, I cover it with wax paper and go over the area with a teaspoon. It helps to get a smooth, even crust.

Cooking tip: My favorite way to crush nuts like walnuts or pecans is to put the nuts in a zip baggie inside another baggie and then crush everything with a rolling pin. I can really control how fine I want to get my nuts, even rolling them at the end to get a really fine crush. Then you just need to throw the zip baggies away. No messy clean up.

Butter Nut Crust

2 cups chopped walnuts or pecans
2 cups flour
4 Tbsp. powdered sugar
1 cup butter, softened but not melted

Mix nuts, flour, powdered sugar and work butter into dry ingredients. Divide mixture in two parts and put half in each pie pan or put all in a 9 x 13 inch pan. Bake at 300 for about 25 minutes. Cool completely!

1 (8 oz.) tub cool whip
2 (8oz.) pkg. cream cheese, at room temperature
2 cups powdered sugar

First, beat cream cheese until smooth with a mixer, then add the powdered sugar and beat, and then add this mixture to the cool whip and beat.

Pour this mixture over the cooled pie crusts or put all in a 9 x 13 inch pan with cooled crust.

Refrigerate 2 or more hours.

1 small pkg. jello chocolate fudge instant pudding
1 cup cream
1 cup milk
1 tsp. vanilla

Combine pudding, cream, milk, and vanilla with a mixer at low speed until mixture begins to thicken. Spread on top of cream cheese layer and refrigerate overnight or several hours.

Note: If you choose to do this in a 9 x 13 inch pan, you may want to double the chocolate layer.

Garnish:

1 chocolate bar

Make chocolate curls using a potato peeler and put on top of pies.


********************* April 12, 2009***************
I took this shot just as the sun was going down and there was a sunbeam coming through the oaks. I loved the glow of light and reflection on the snow and puddles


In this picture, I loved the reflection of the stark bare oaks in the puddles in contrast to the sunlight. I believe there is beauty everyday on our Mountain, even in the mud puddles.

-Debbie -

Monday, April 13, 2009

Maple Butter and Maple Syrup


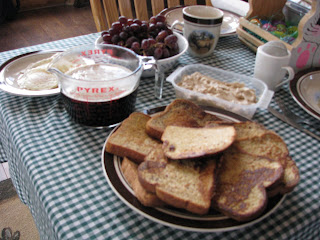
Wow! Easter Breakfast at the Deb's Cabin looks pretty good to me!


From Debby:

Usually I make homemade cinnamon rolls for Easter breakfast, but this year I wanted something new. My son loves French Toast and I came across these two recipes that made the French Toast even better.

The syrup is something you can make with ingredients in your cupboard and to me it tastes even better (not as good a REAL maple syrup but better than the store brands)

Maple Syrup

1 cup brown sugar
1 cup white sugar
1 cup clear corn syrup
1/2 to 1 tsp. maple extract

In a saucepan bring to boil sugars and corn syrup simmer 5 minutes remove from heat add maple extract. Store in a bottle - if you want thinner syrup - omit the corn syrup.

Maple Butter

1 cube butter - softened
4 oz. cream cheese - softened
1 cup powder sugar
1 tsp. maple extract

Put all ingredients in a bowl - mix with hand mixer or in food processor. Blend well - place in a serving bowl. Use on french toast, pancakes, waffles, etc. Stores well in refrigerator for several weeks.

This is a keeper in our family - we like breakfast for dinner and I will keep these in my fridge!

*************************************************************

Thanks Deb for these great recipes. There have been times that I have run out of pancake syrup while at the cabin so I'm going to get some maple extract and keep it on hand. Also, I love all types of "butters" but I've never tried maple. It's on my list of things to try for this week.

I welcome ideas and recipes from those of you out there who may be following this blog. To me, new recipes and ideas are treasures. Just E-Mail me at debcm7@gmail.com You don't need to have a picture to submit a recipe or cooking idea.

Friday, April 10, 2009

Shepherds Sage Bread


"I am the good shepherd: the good shepherd giveth his life for the sheep."

John 10:11


This Easter I contemplated what type of recipe to submit. I considered several favorite desserts, twisted wreath breads with red eggs baked in them, and rolls in the shape of a lamb. However, none of these things reflected what my heart feels at this sacred season. So it is that I chose to share a simple shepherds bread, for Christ is the good shepherd, who indeed did lay down his life for all of us.

1 1/4 cups water
2 Tbsp. olive oil
3 cups flour
4 tsp. sugar
2 tsp. dried rubbed sage
1 1/4 tsp. salt
2 tsp. bread machine yeast

Pour all wet ingredients into bread machine baking pan. Measure all other ingredients except yeast into baking pan. Sprinkle yeast over dry ingredients, being careful not to get yeast wet. I only use the mixing cycle on my machine which takes about 30 minutes. When the mixing is finished and the machine has stopped, take the dough out and put it in a bowl that has been sprayed with Pam and cover with plastic wrap that has been sprayed with Pam. Let rise until double. Punch down dough and then shape in a ball and put on a baking stone or cookie sheet that has been sprinkled with corn meal. Cover with the plastic wrap again and let raise until doubled. Remove wrap and bake in a 375 degree oven.

The sage just gives this bread a gentle herb flavor and is not overpowering. I also love the subtle flavor of the olive oil.

Mixing Tip: Spray your bread machine pan with Pam and the dough hardly sticks to the sides at all. Consequently, I think it gets a better kneading.


-Debbie -